|
Convention Pins: Air Dry Clay
Supplies:
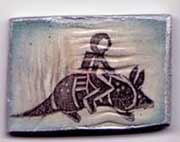
Creative Paperclay Rolling pin Craft knife Stamps (in this case hand carved stamps) Stamp Ink (I used black pigment ink) Nail file Blue and Black Chalk Silver paint marker Pin Backs (the ones with the foam on the back) Sealer Roll out a sheet of clay approximately 1/8th inch thick. Using a craft knife cut out squares 1 1/2" wide by 1" tall. Stamp the clay with the main image. In this pin I stamped the clay with the armadillo space man then with a texture stamp I made which is the texture in the piece. Let clay dry for 24 hours. I turn it over after 12 hours.
After the clay is dry sand the edges if there are any rough spots. Using the blue chalk, color the edges of the piece leaving some of the middle the natural color. Then with the black chalk go over the blue, making it a much dustier color.
With the silver marker go around the edge of the piece. Seal it with the sealer and when it is dry add the pin back.
Tada! A cool pin.
Other Pin Projects:
- Air Dry Clay Pin
- Shrink Plastic Pin
- Bottle Cap Pin